“Charlie and the Chocolate Factory” bouquets

The high school play was “Charlie and the Chocolate Factory” and all 3 of the triplets were part of the cast.  Tradition might suggest flowers for the final night performance but I beg to differ.  Cookie bouquets are unique and so delicious (even if they don’t last as long as blooms! yum. yum.).  I do believe Willy Wonka and the Oompa Loompas would approve.

DSC_0571 DSC_0578 DSC_0586 DSC_0599

Olaf from Frozen the movie

Okay, Olaf is totally cool but Kaylyn is even cooler!  And these are her birthday favors…

DSC_0621

I started with a design of Olaf making a snow angel and a dried, white iced cookie.  I drew Olaf’s basic shape with a blue edible food marker; this was to achieve that slight bit of blue to distinguish Olaf from his same colored background.  I then filled in the face and the lower body and gave that a rest.  Followed that (after dried) with the middle section and the feet.

DSC_0602 DSC_0605

I used a simplified brush embroidery technique (thank you Sweet Ambs) to give the snow angel effect and then added arms, mouth, nose eyes, buttons, and extra snow.

DSC_0607 DSC_0610

Finished the process with 1) black edible “paint” (see previous posts on how to paint) for hair and face details and 2) stamping “cool” and paint-outlining the whole cookie in blue.  The favors were bagged and tagged but, alas, no final pics of finished favors.  DSC_0616 DSC_0629

Rustic Wedding

Wanted to make a “storyboard” for my niece and her rustic wedding.

DSC_0564

Base icing for heart shaped tree slice and other cookies completed.

DSC_0552

Next time I will stamp the bride and groom name and add their wedding date.  Always room for improvements…

DSC_0565

Little grapevine wreath.

DSC_0571

Pinecones with dimension.

DSC_0566

Ready for approval.  Or not?DSC_0555

St Paddy’s Day 2014

Everyone’s Irish for a day (or two or three…).  Or at least a wee bit.  Here’s my way of celebrating this year.  And, a special thank you goes out to my leprechaun helper, Sean.  Definitely a favorite ginger.

Conversation Shamrocks.

cpnversation shamrocks DSC_0561

What The Luck?

DSC_0557 DSC_0563

‘ish puns.  questionable humor.

DSC_0565

wee leprechauns for good luck.

DSC_0582 Sean and leprechaun

Pub science sounds a lot like pubescence.  May result in similar behavior.

DSC_0560

Pi Day 2014!

This is the one day to be completely “irrational!”  Let’s hear it for never ending Pi and all of it’s crazy connections (NPR has some links to crazy Pi facts and activities!).  The Pi platter included pumpkin and key lime pie, a cow pie, pirates and and a concoction or circular area and circumference.DSC_0579 DSC_0568

And, in memory of a great physicist and mathematician, happy birthday Albert E!  May we all go forth and passionately create our own theory of what is relative!

DSC_0572

Vera Bradley Birthday Party

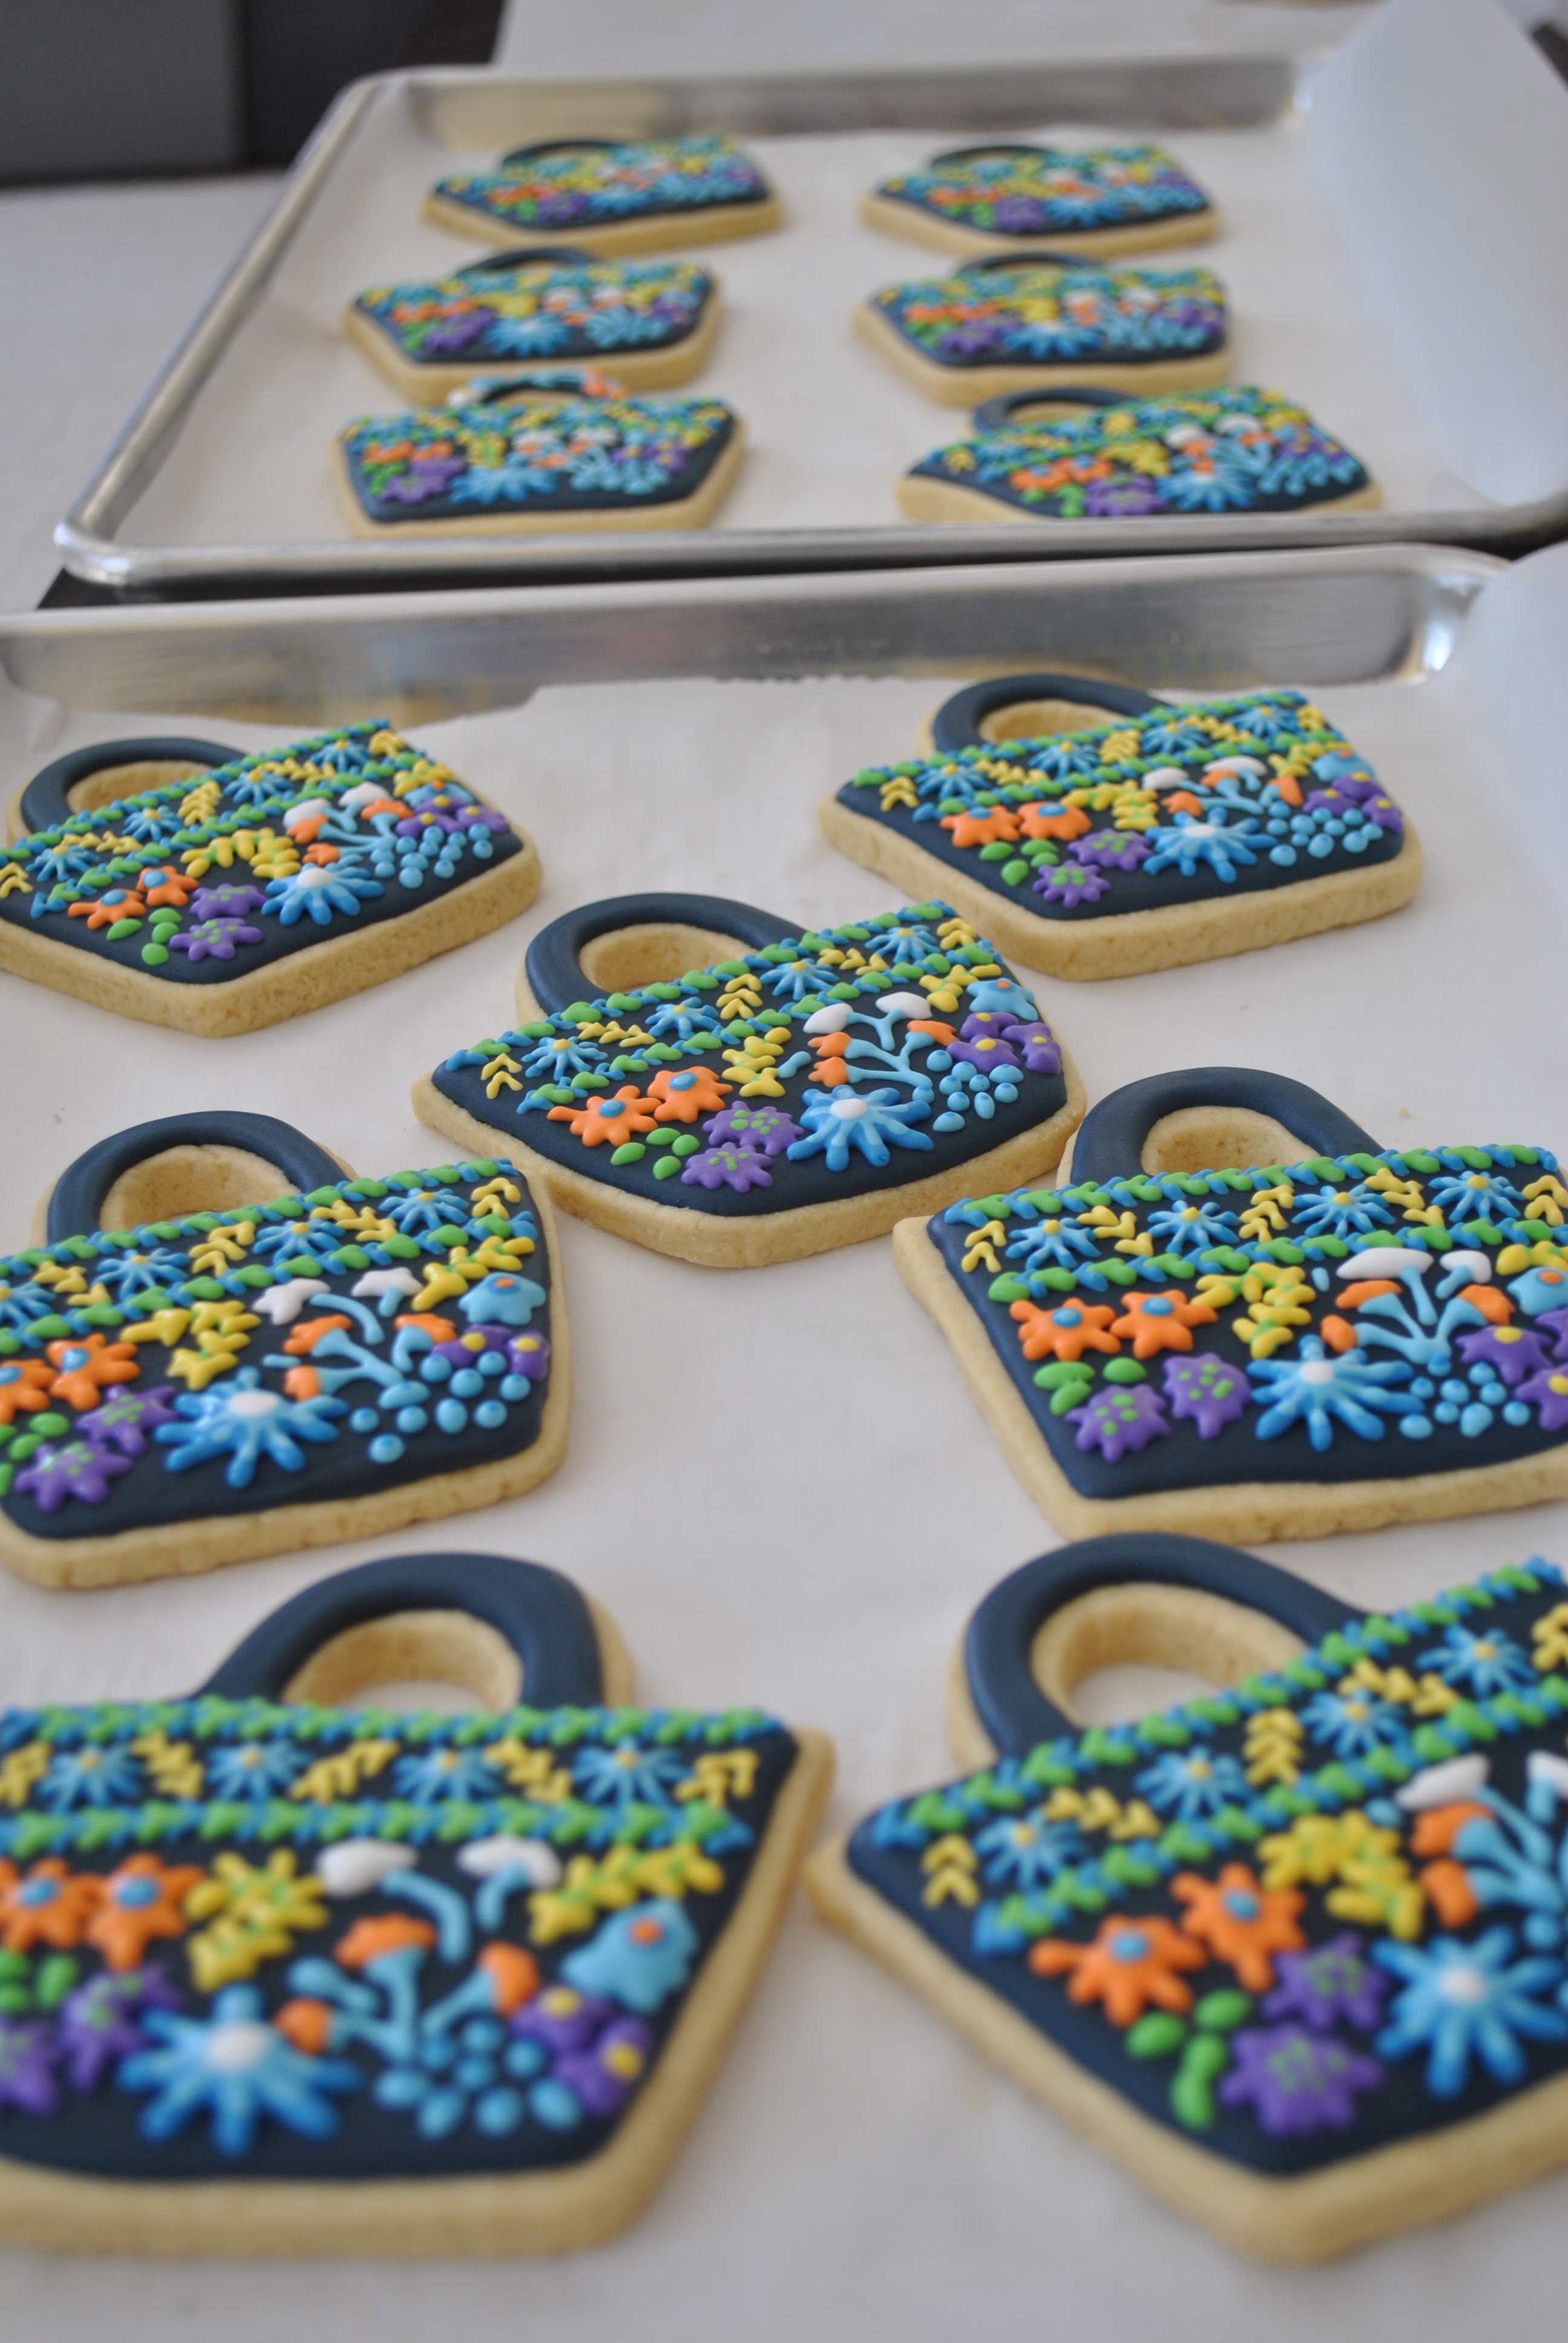
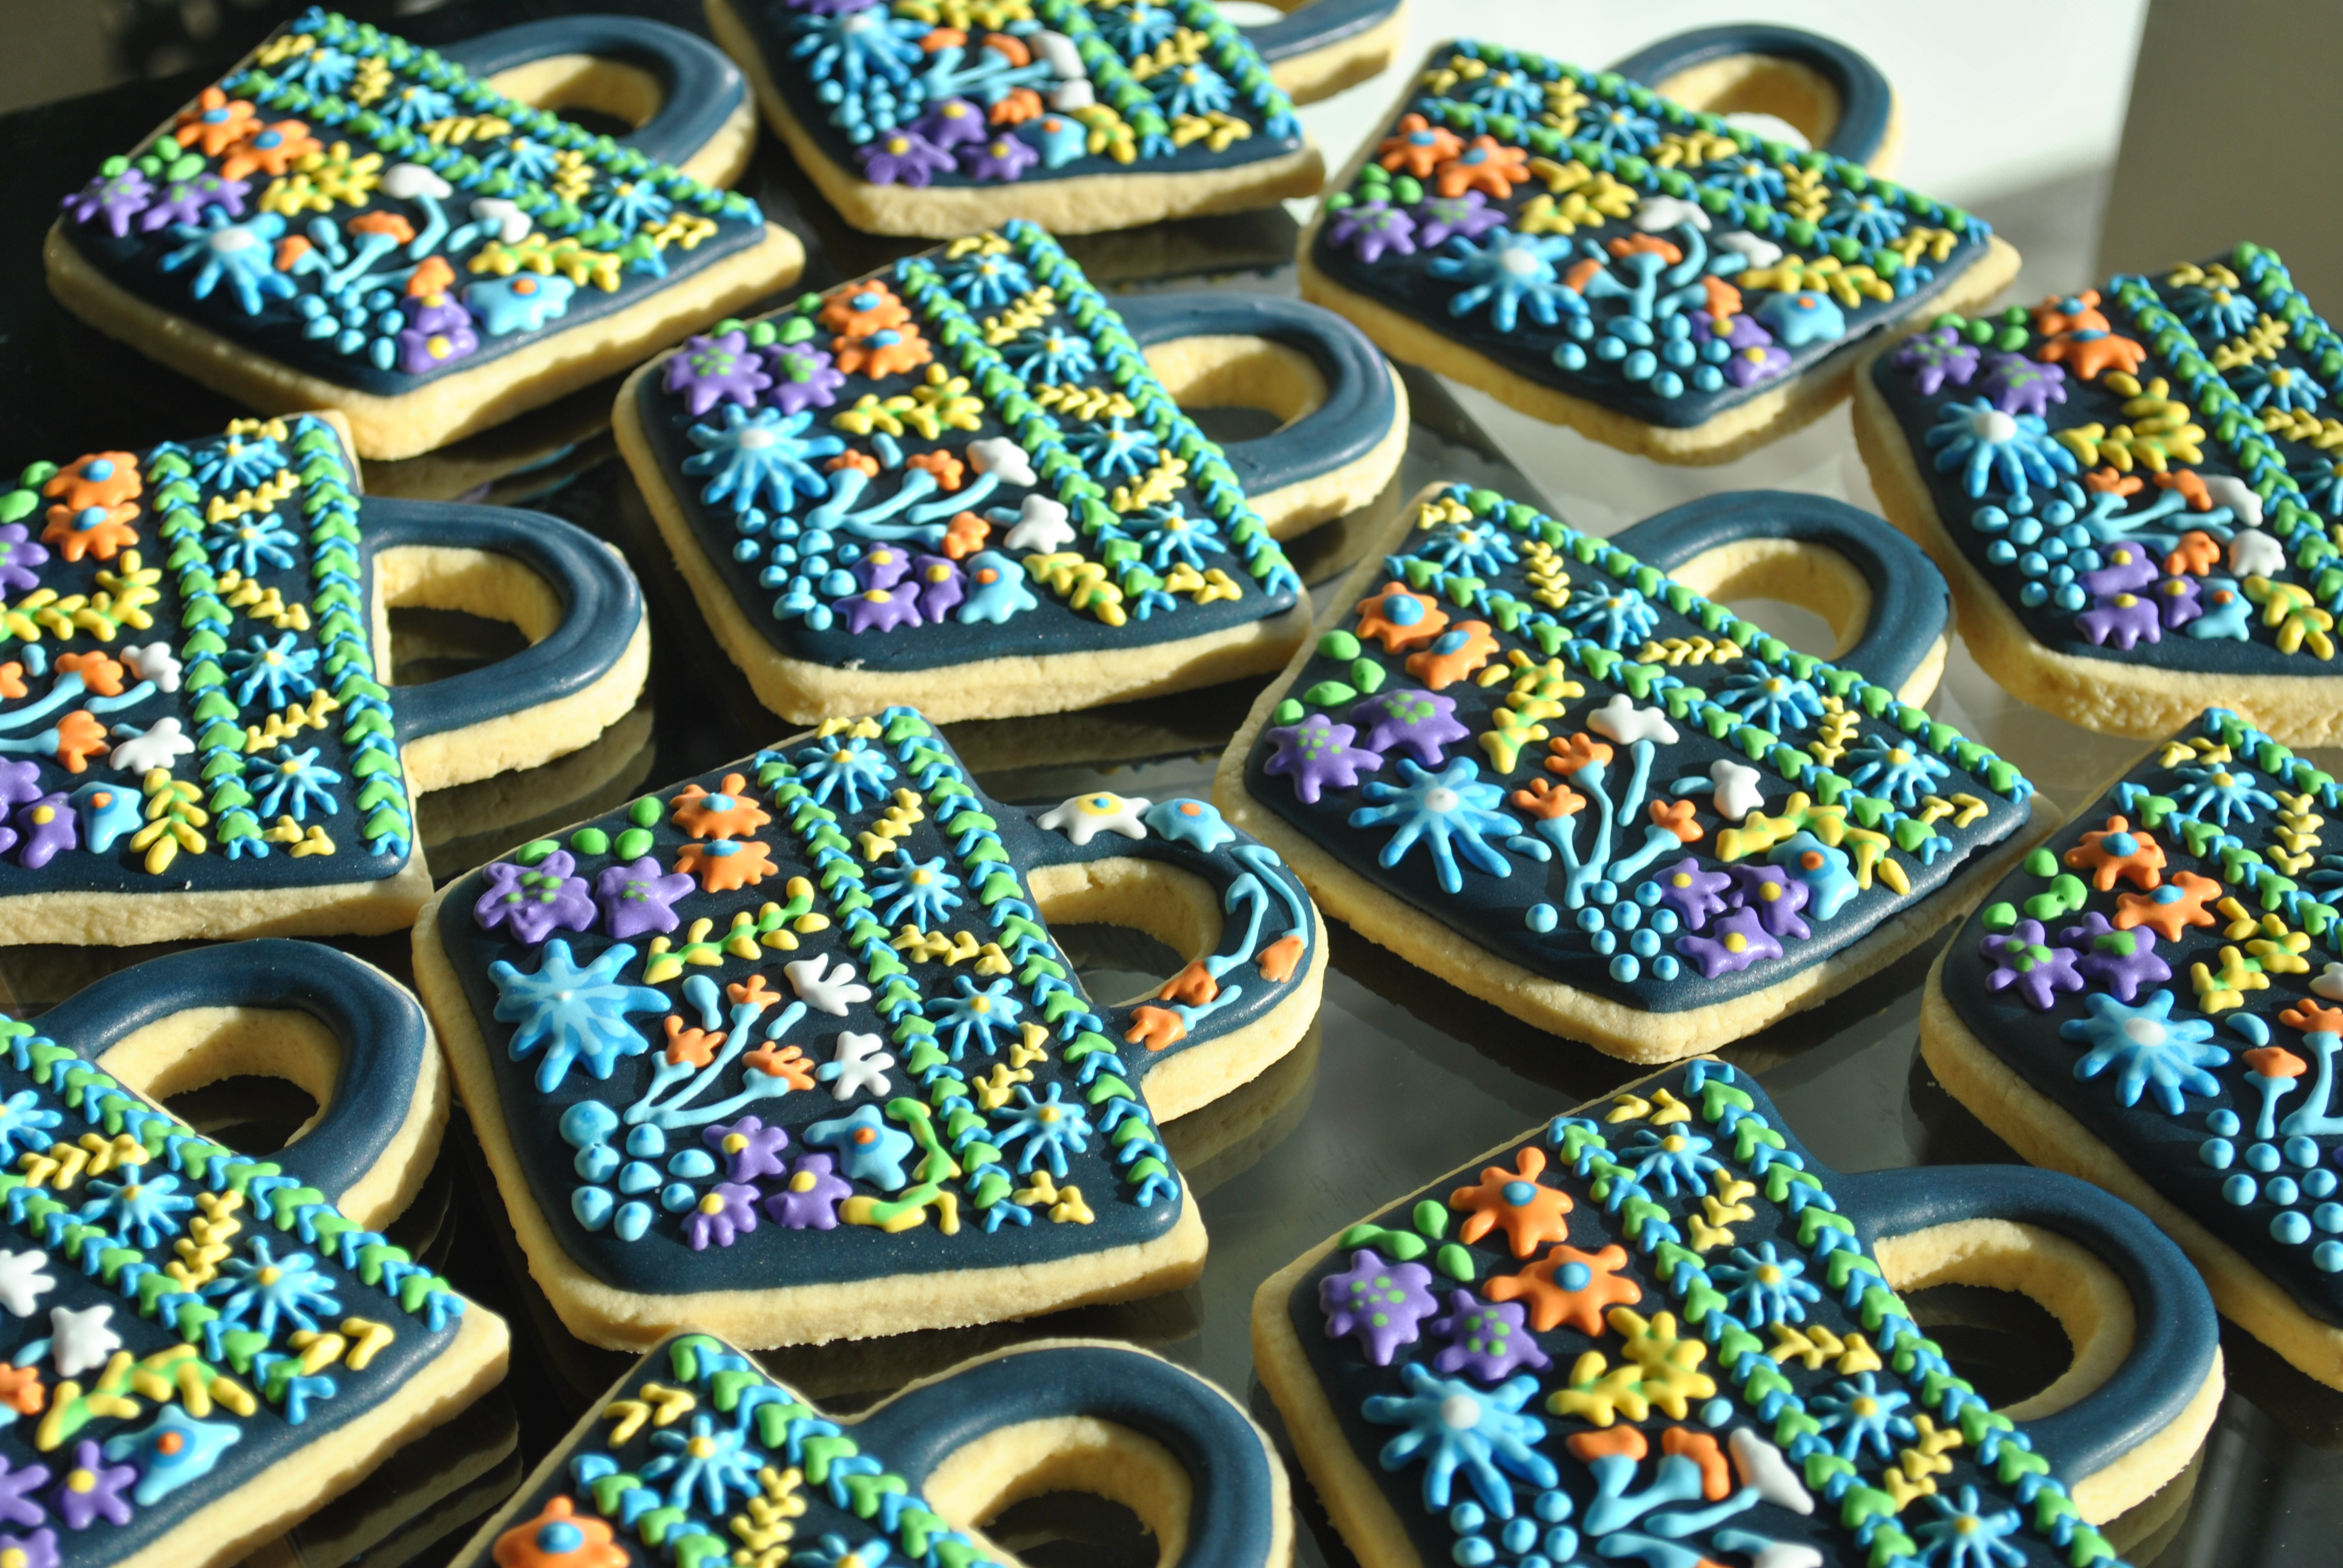
Midnight Blues is the pattern.  I definitely saw midnight and a LOT of blue when decorating the cookies for this birthday party…

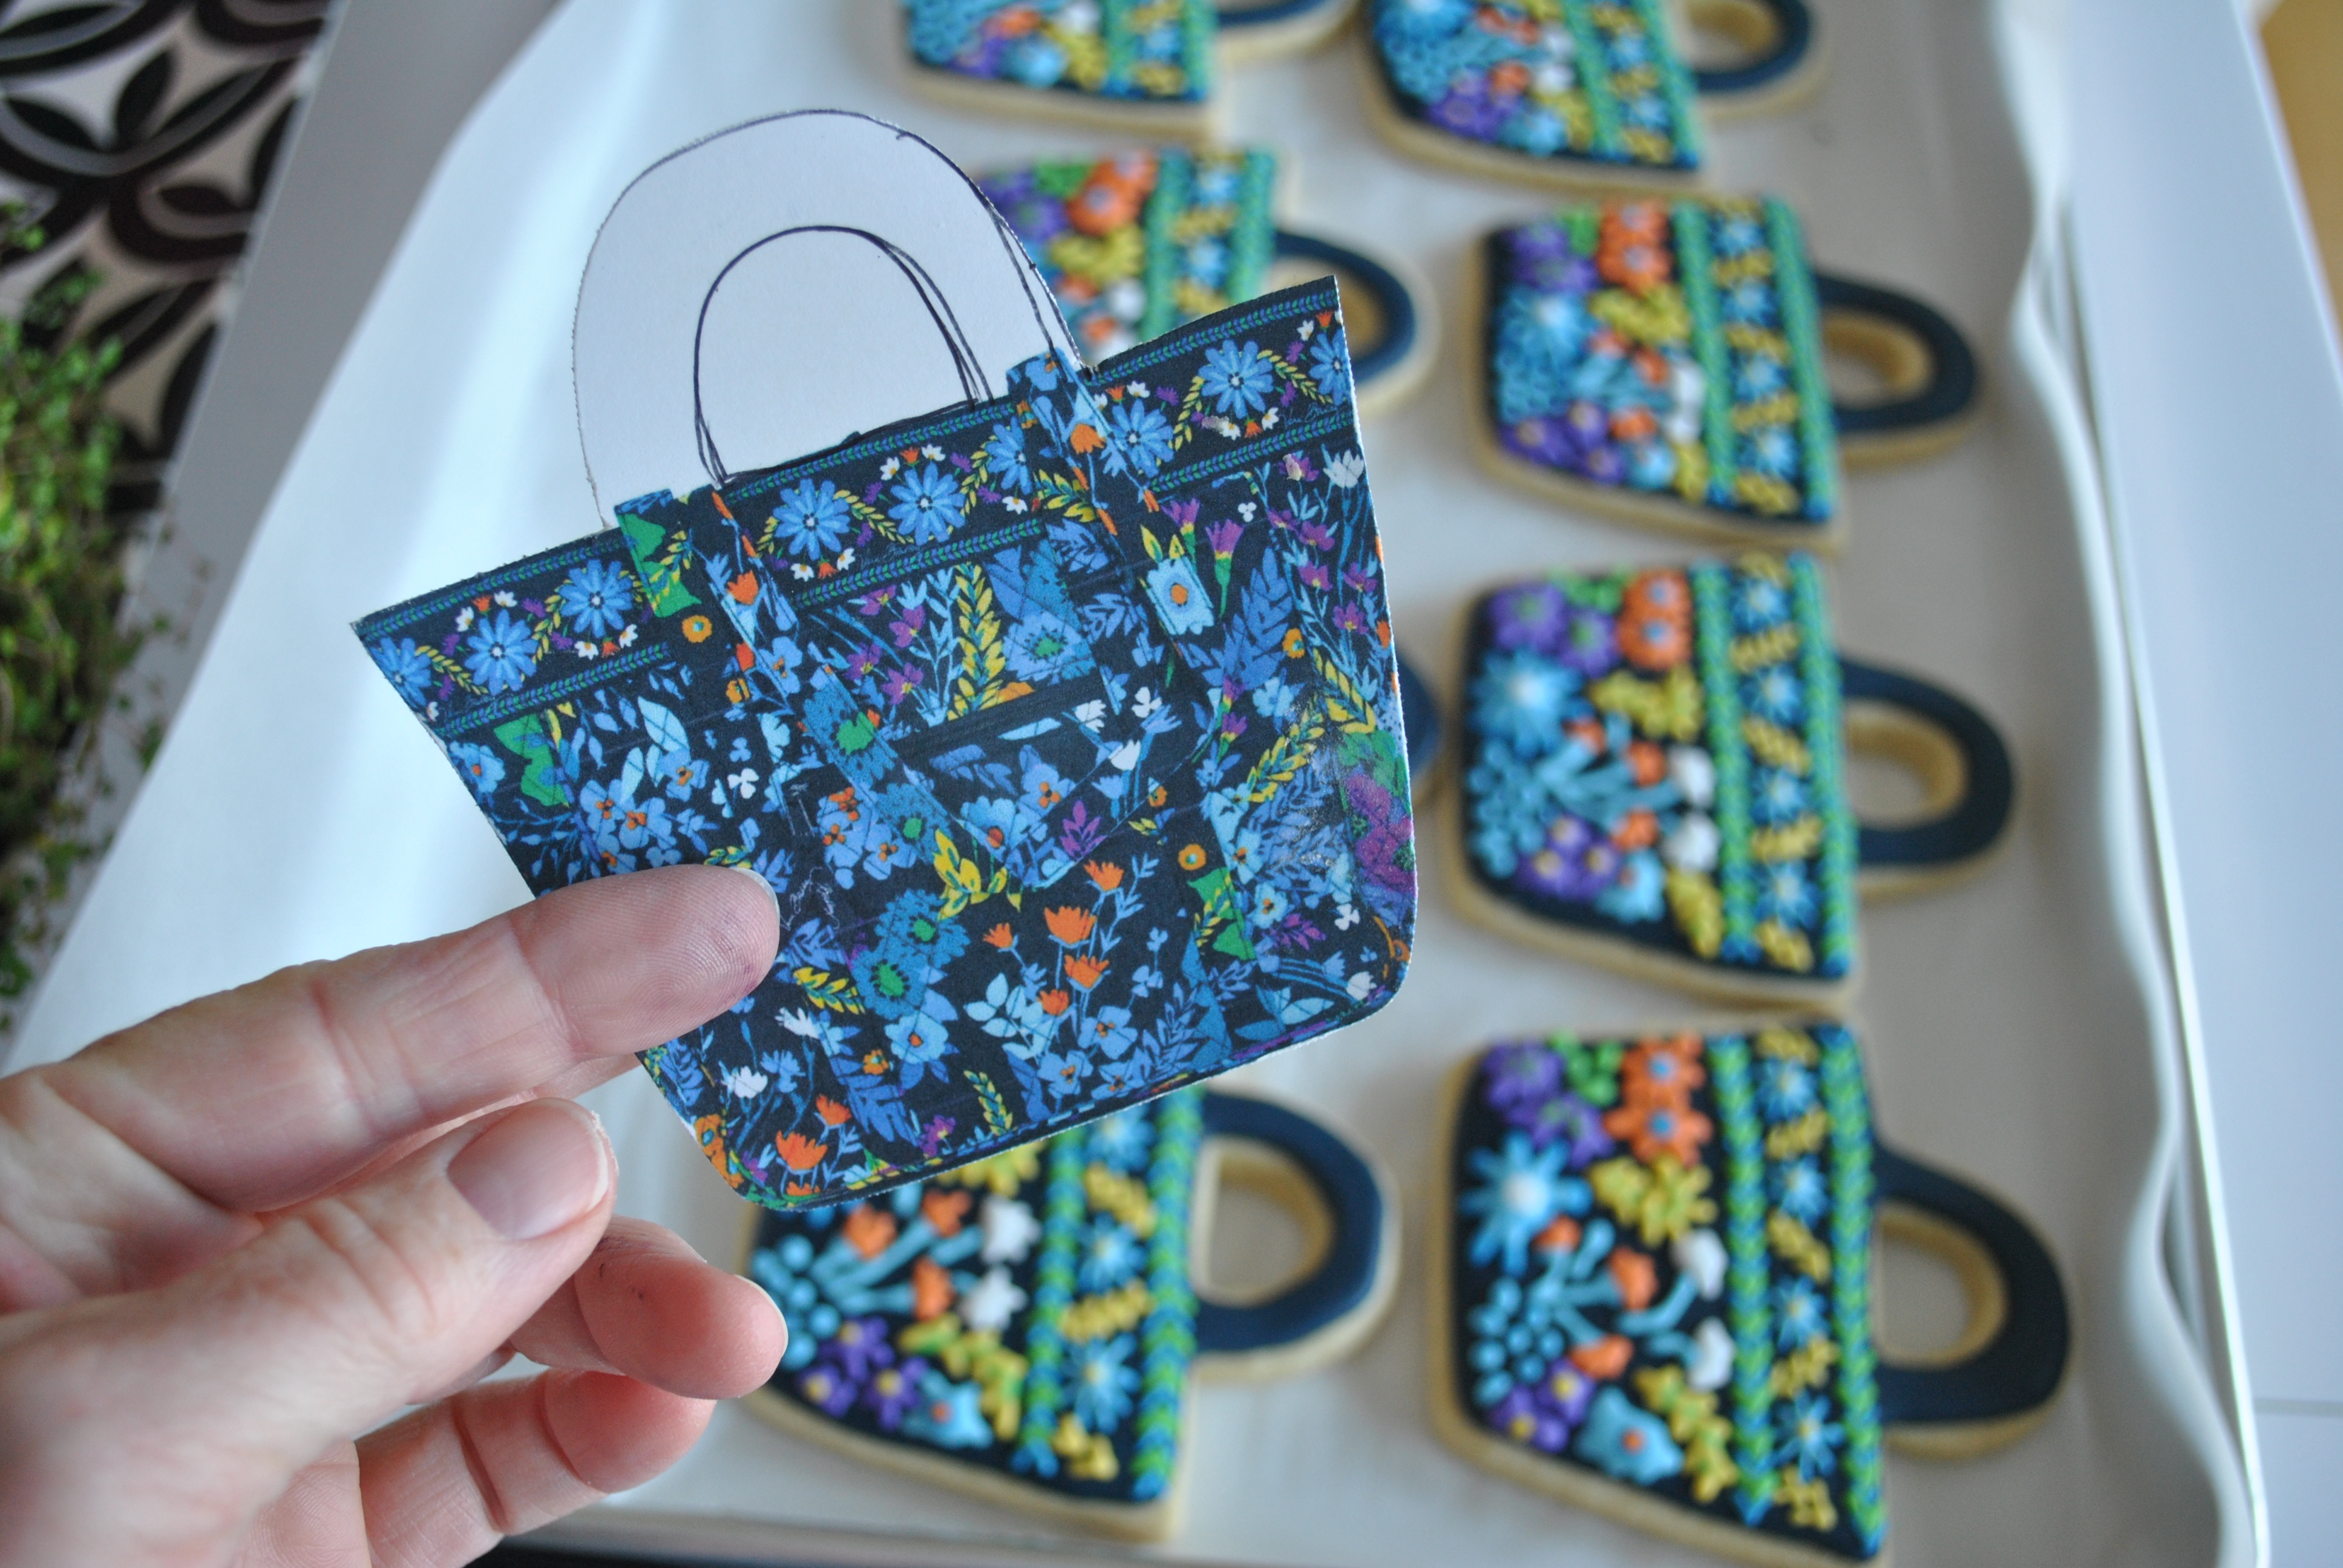
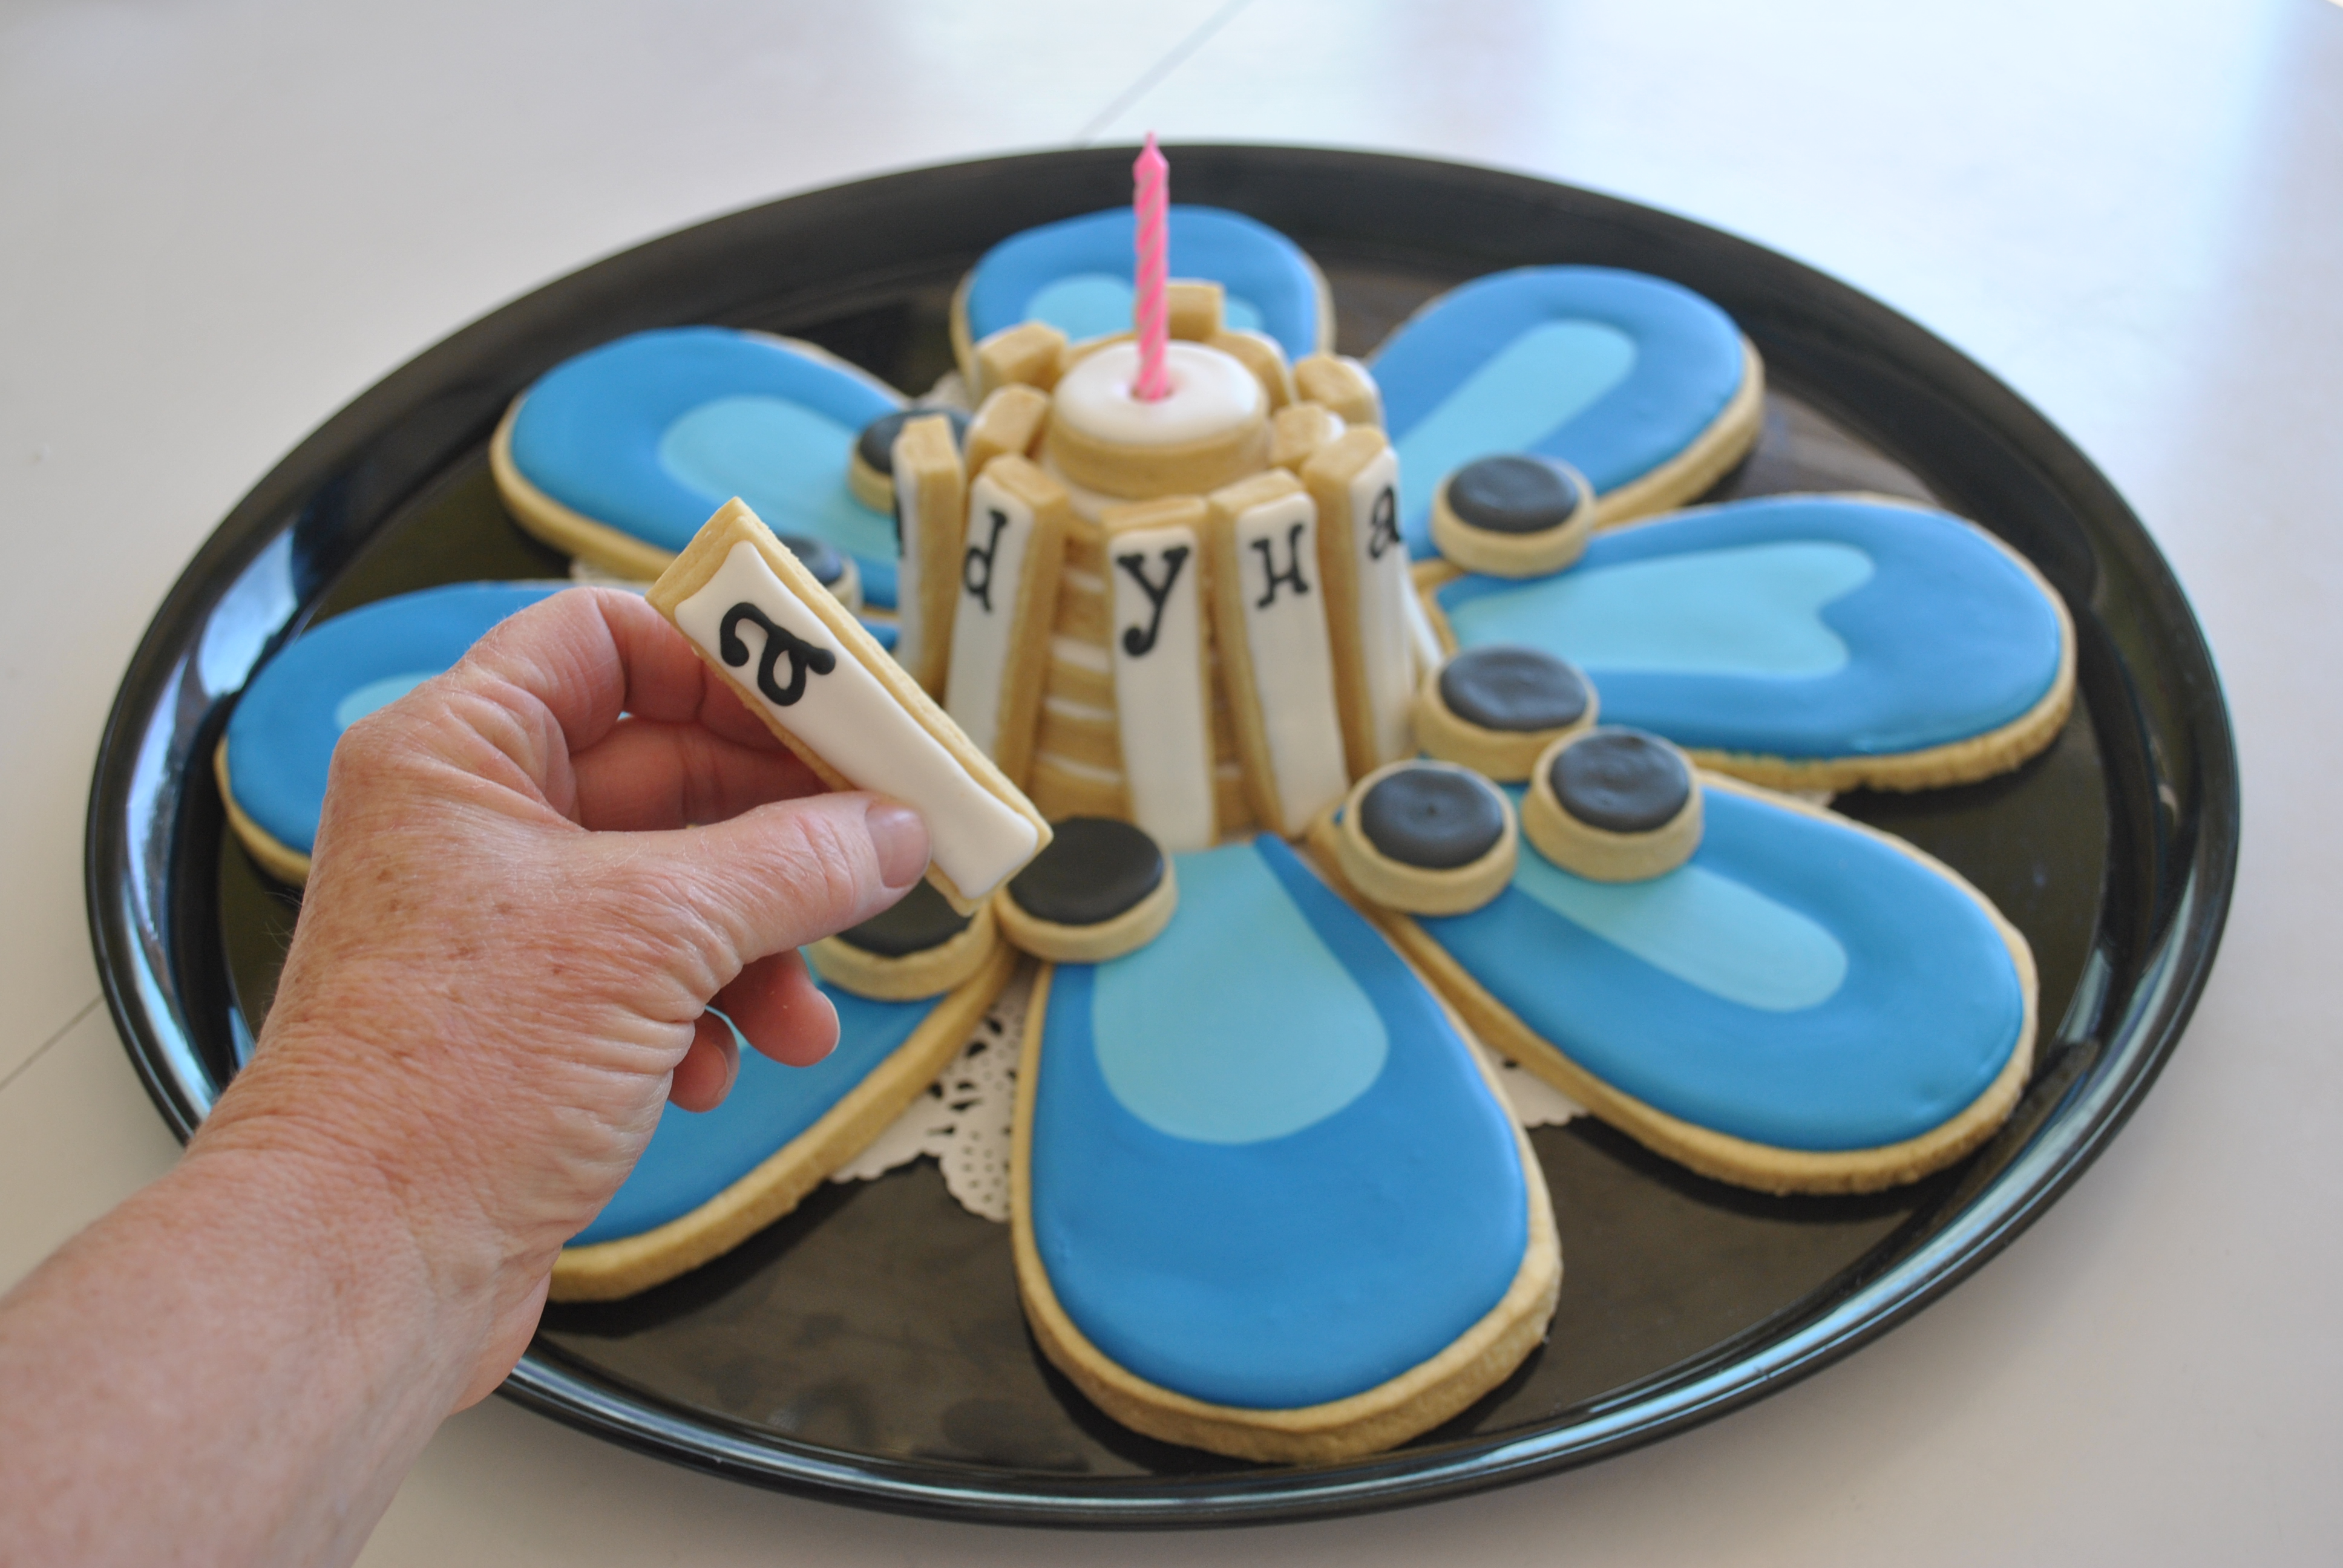
Requested were 12 favors that had the pattern on a purse plus one large cookie cake.  I took the daisy within the pattern and made the “cake” such that guests could pull a large petal or a small cookie, depending on their appetite.DSC_0695

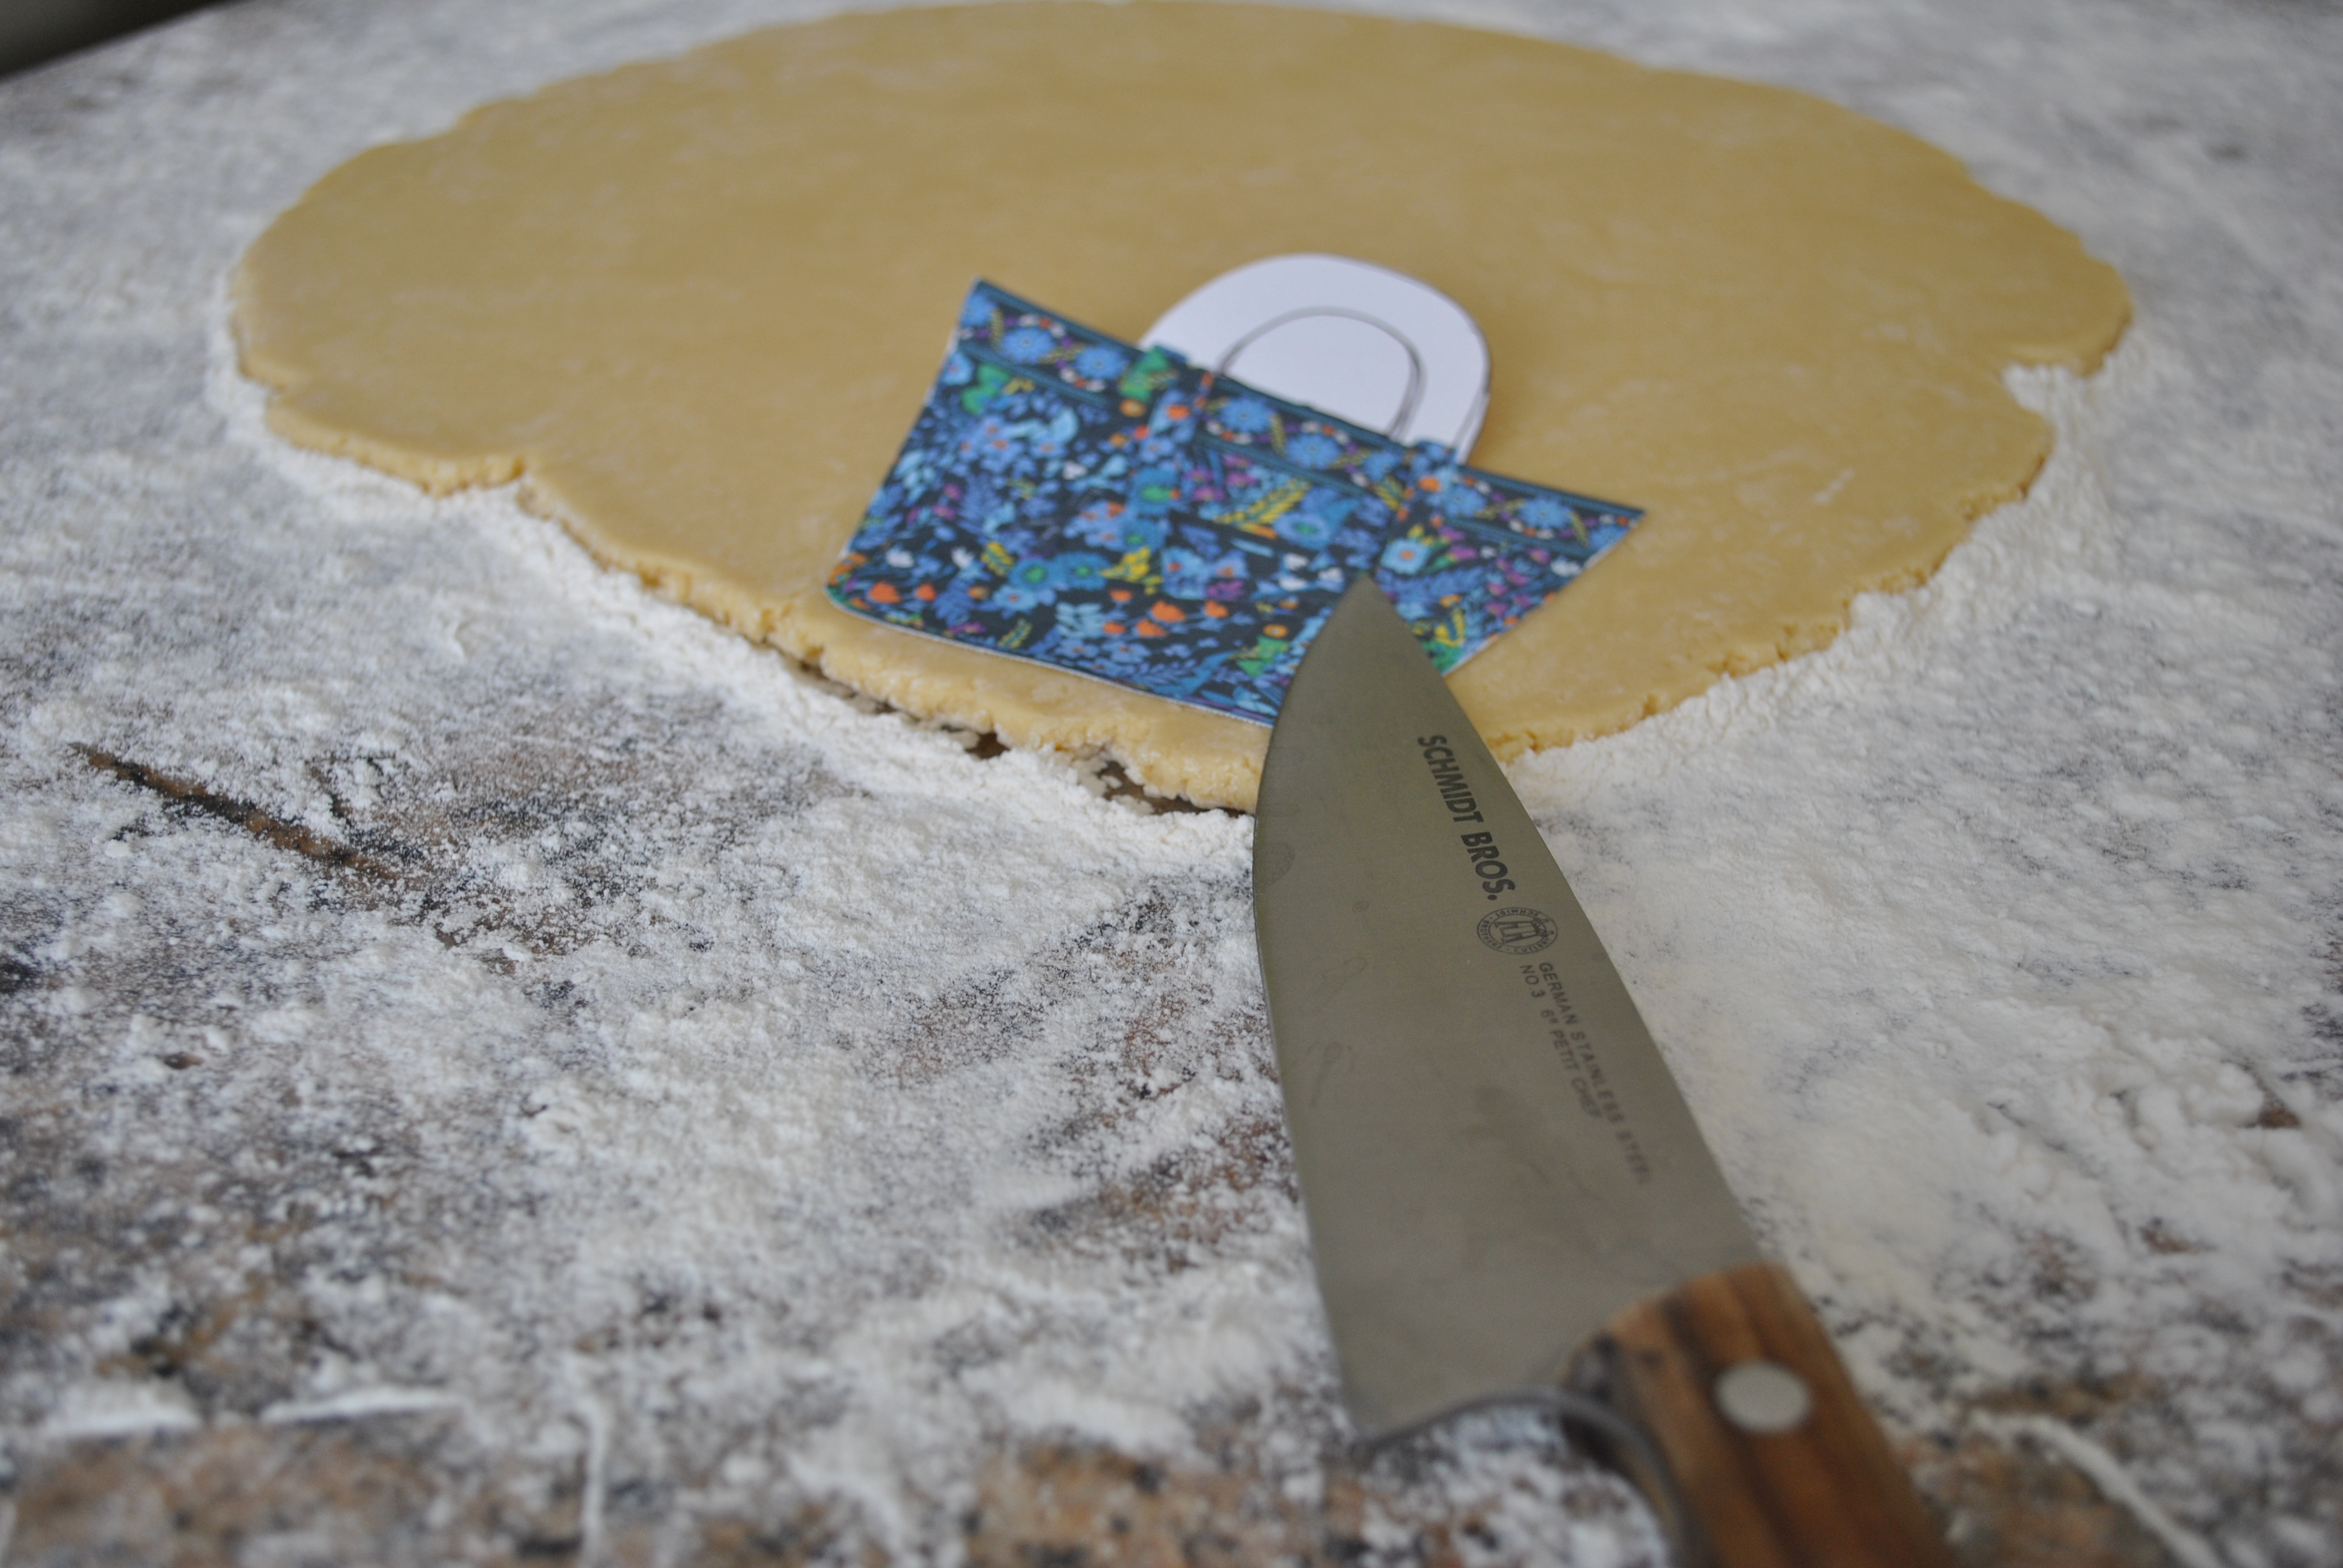
I didn’t have a cookie cutter to match so I sized a 4×4″ purse on card stock and hand cut the shape.

DSC_0553

The base layer was a very saturated black.blue (half and half Americolor royal blue and black, required lots of gel to achieve the color).

DSC_0557

After drying the base overnight, I began applying the flower pattern.  Yellow= Lemon yellow with a drop or two of egg yellow.  Blue= Royal blue: just a little bit for the light blue and several drops more for the darker.  Green= Leaf green. Orange= orange. Purple= Violet with a couple drops of regal purple.  Americolor gels all.  I wish I could tell you exactly how many drops but 1) I mixed without counting & 2) it does depend on how much icing you are tinting.  I had sketched a pattern first to balance the colors on the cookie and it mostly worked.  That is also why I always, always make an extra cookie or two for my “oops.”

DSC_0564 DSC_0562 DSC_0567 DSC_0568 DSC_0653 DSC_0659

Here’s how they turned out against a print of the original design.

DSC_0672

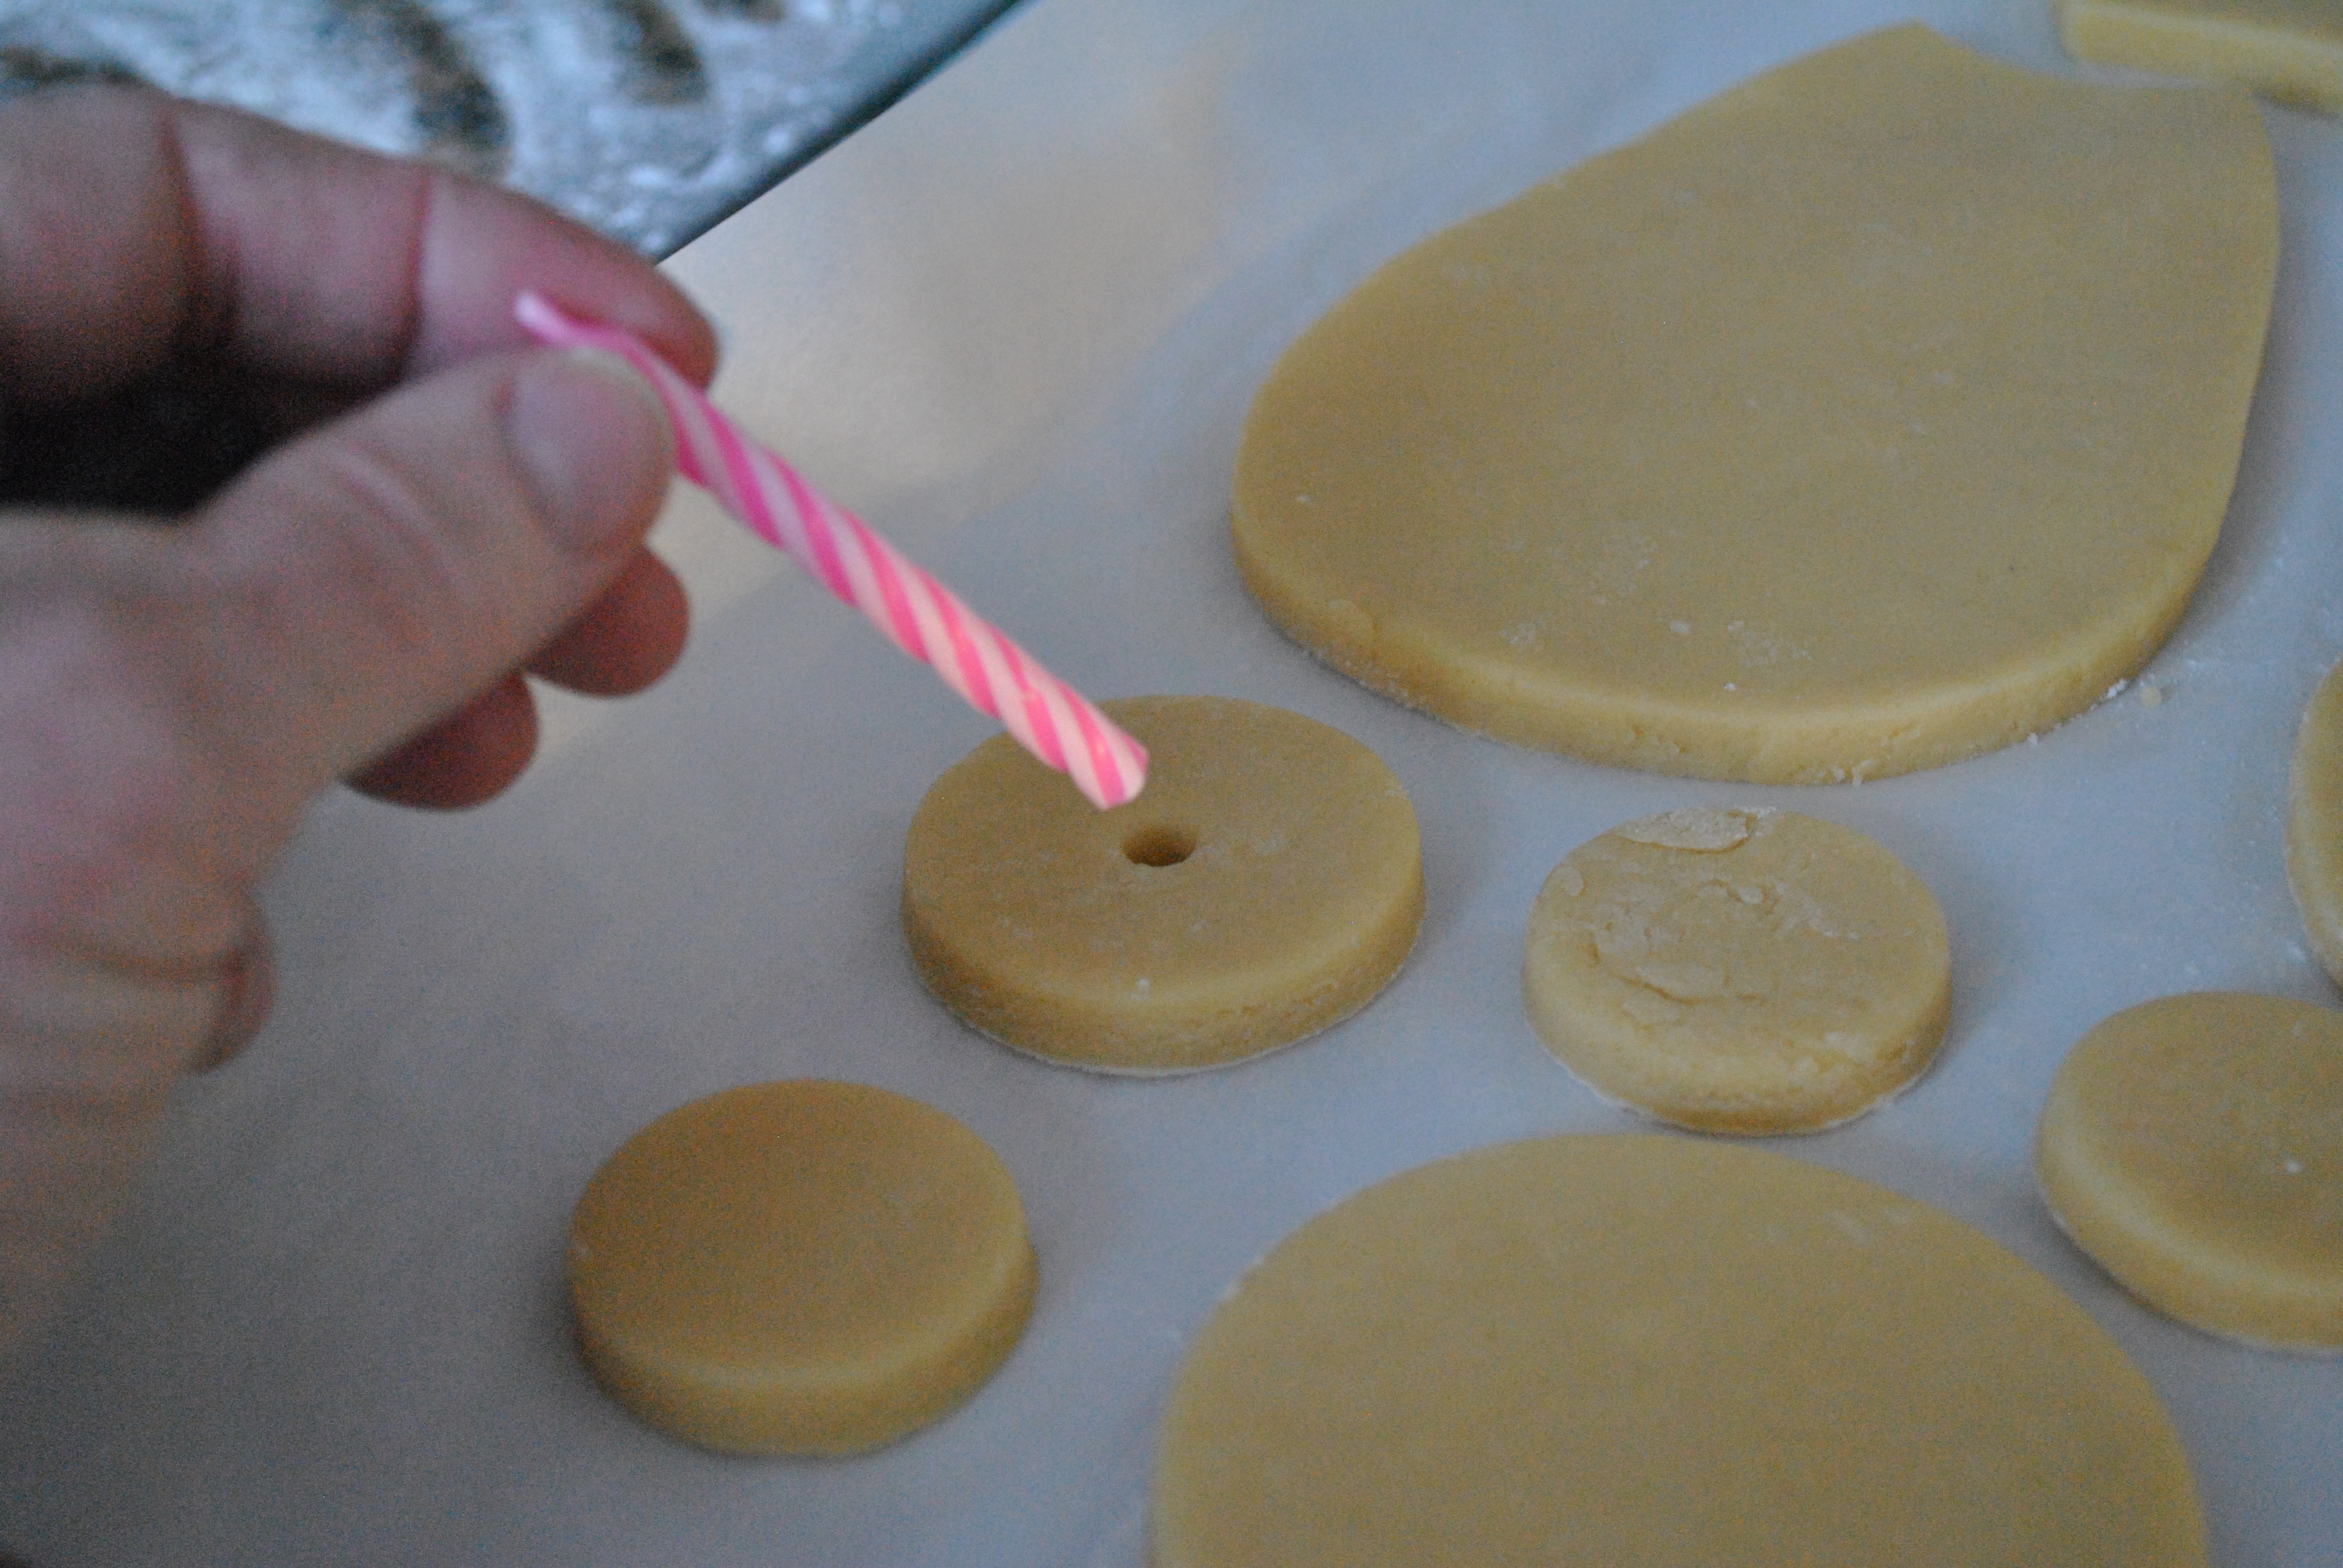
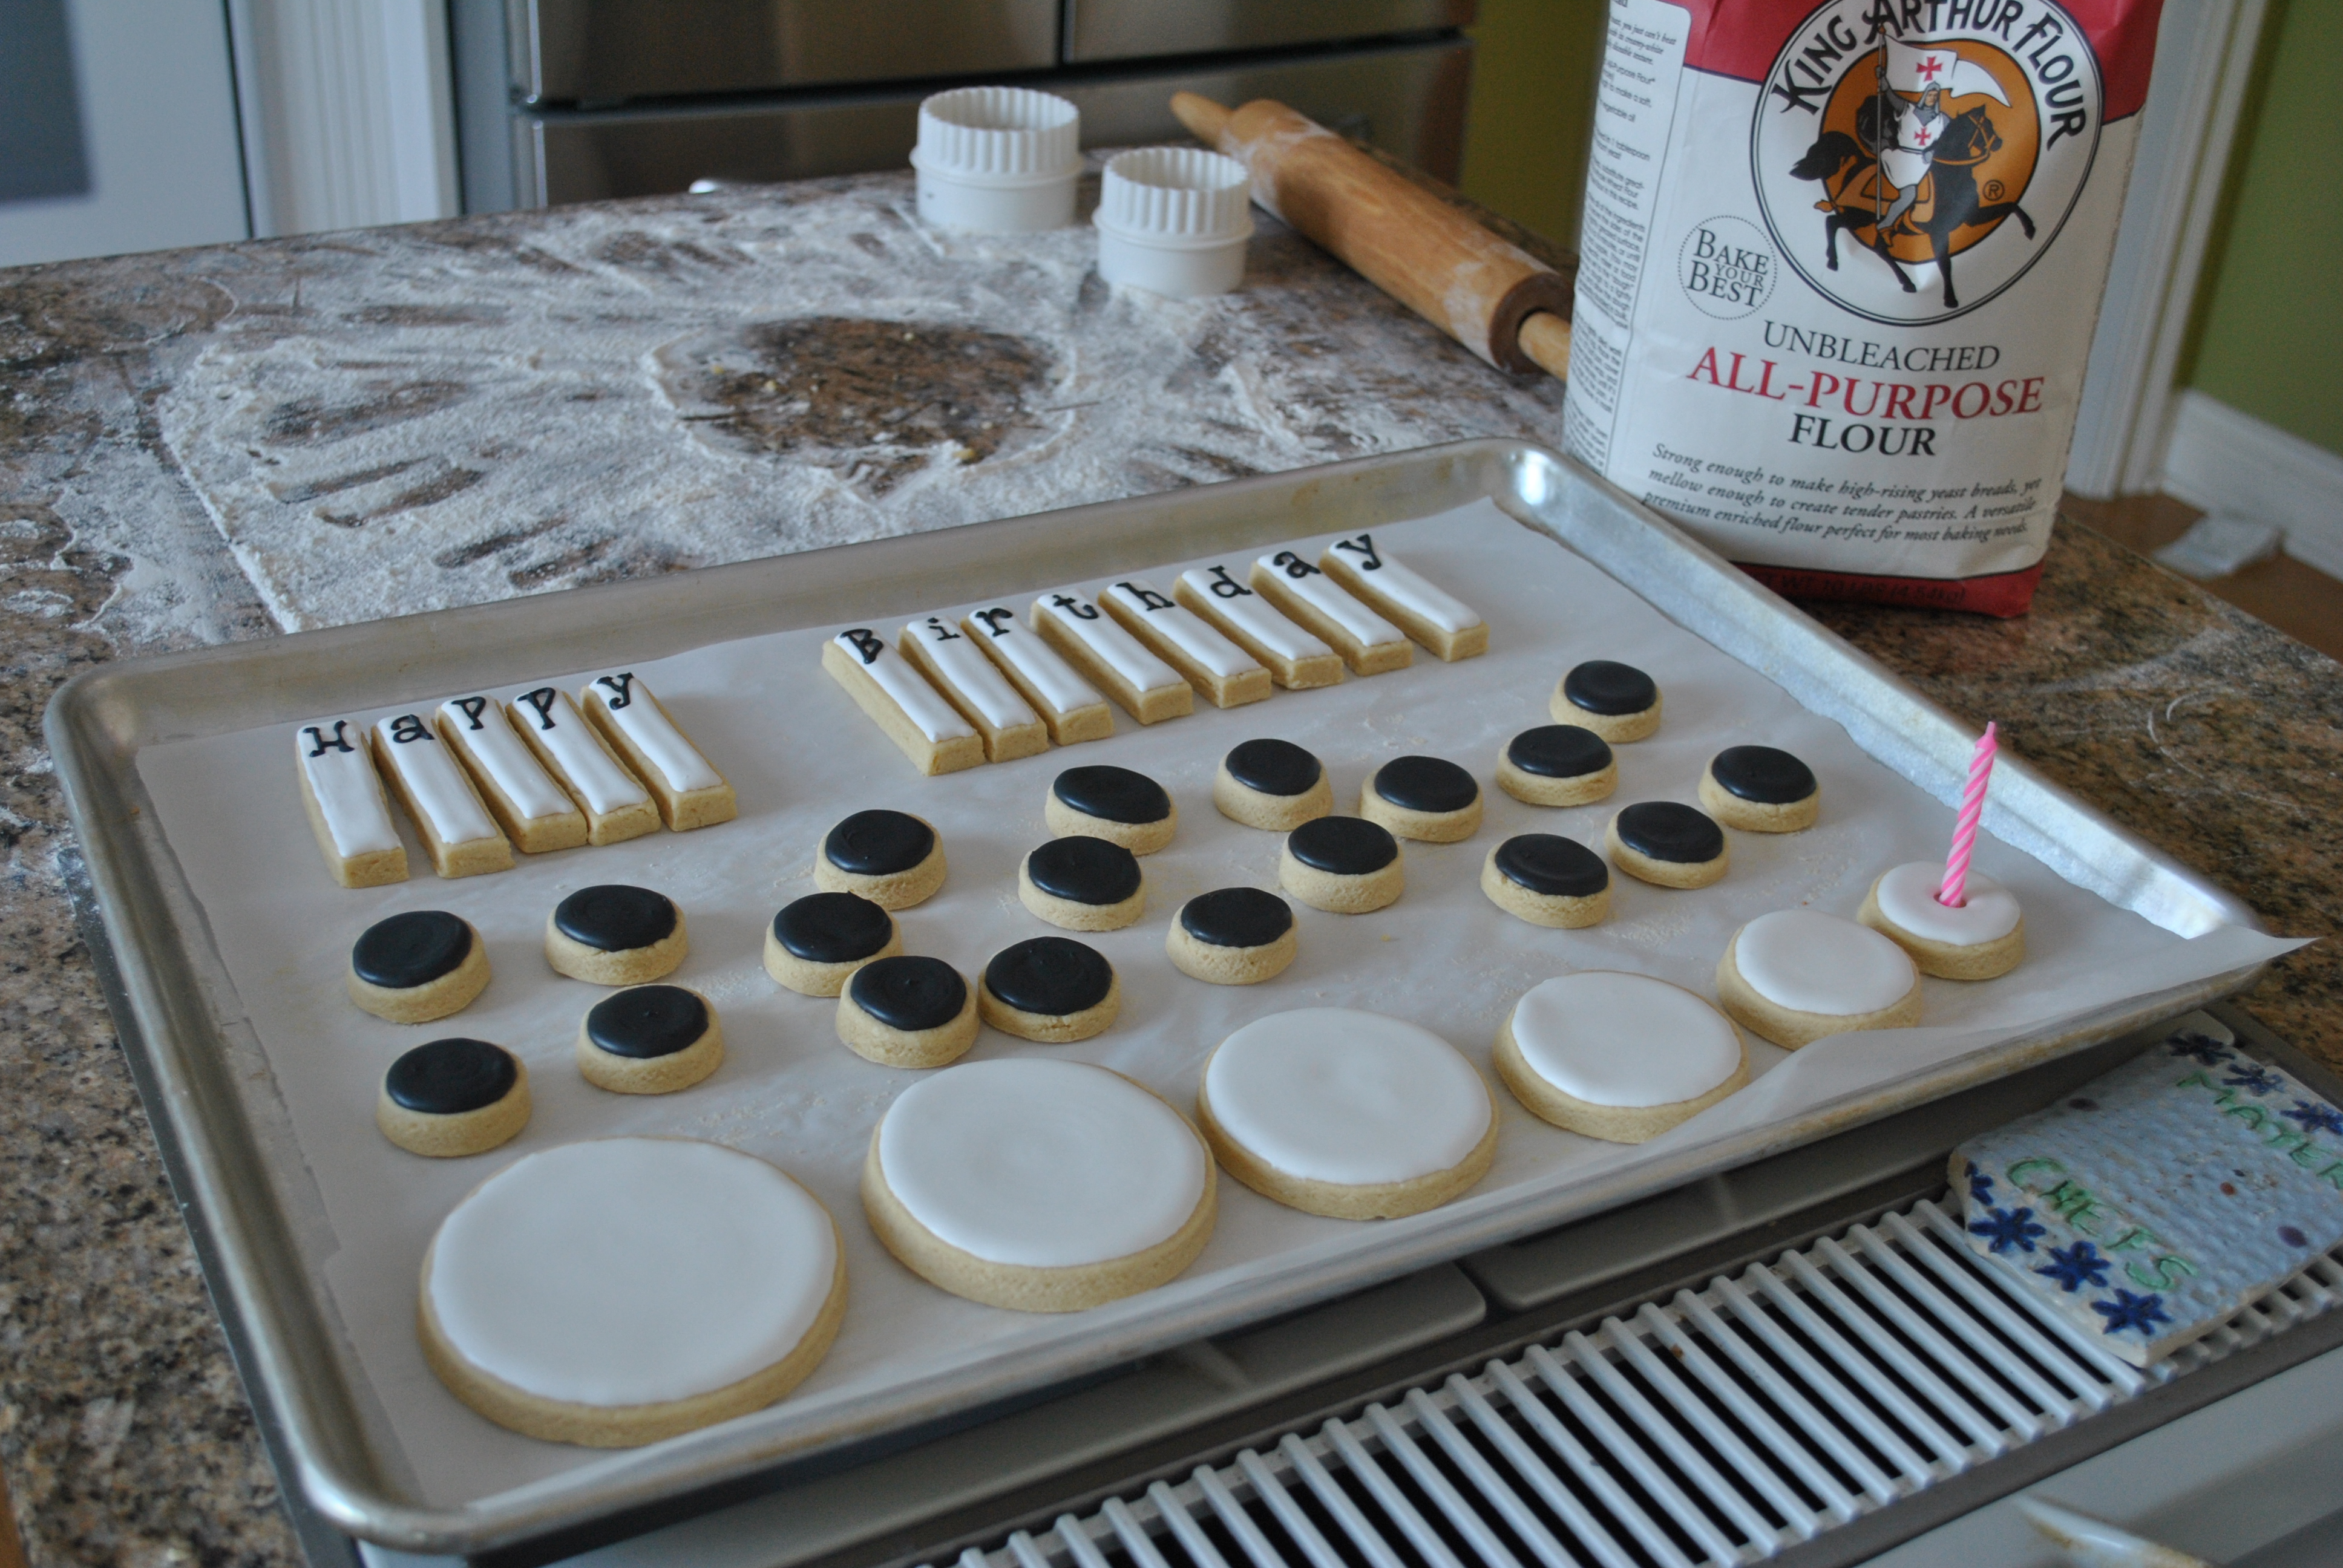
Next I moved on to the cookie cake.  Sorry but it required a little math.  I measured the serving platter diameter and from there figured out how wide top and bottom each petal needed to be, considering that I would have a 4″ circular center and 8 petals, etc.  (If you really want to know how to calculate the measurements, comment back and I will tell.  A little boring.)  Made a hole with/for a candle in top cookie of stack.  Did this BEFORE I baked the cookies.

DSC_0665 DSC_0668 DSC_0673

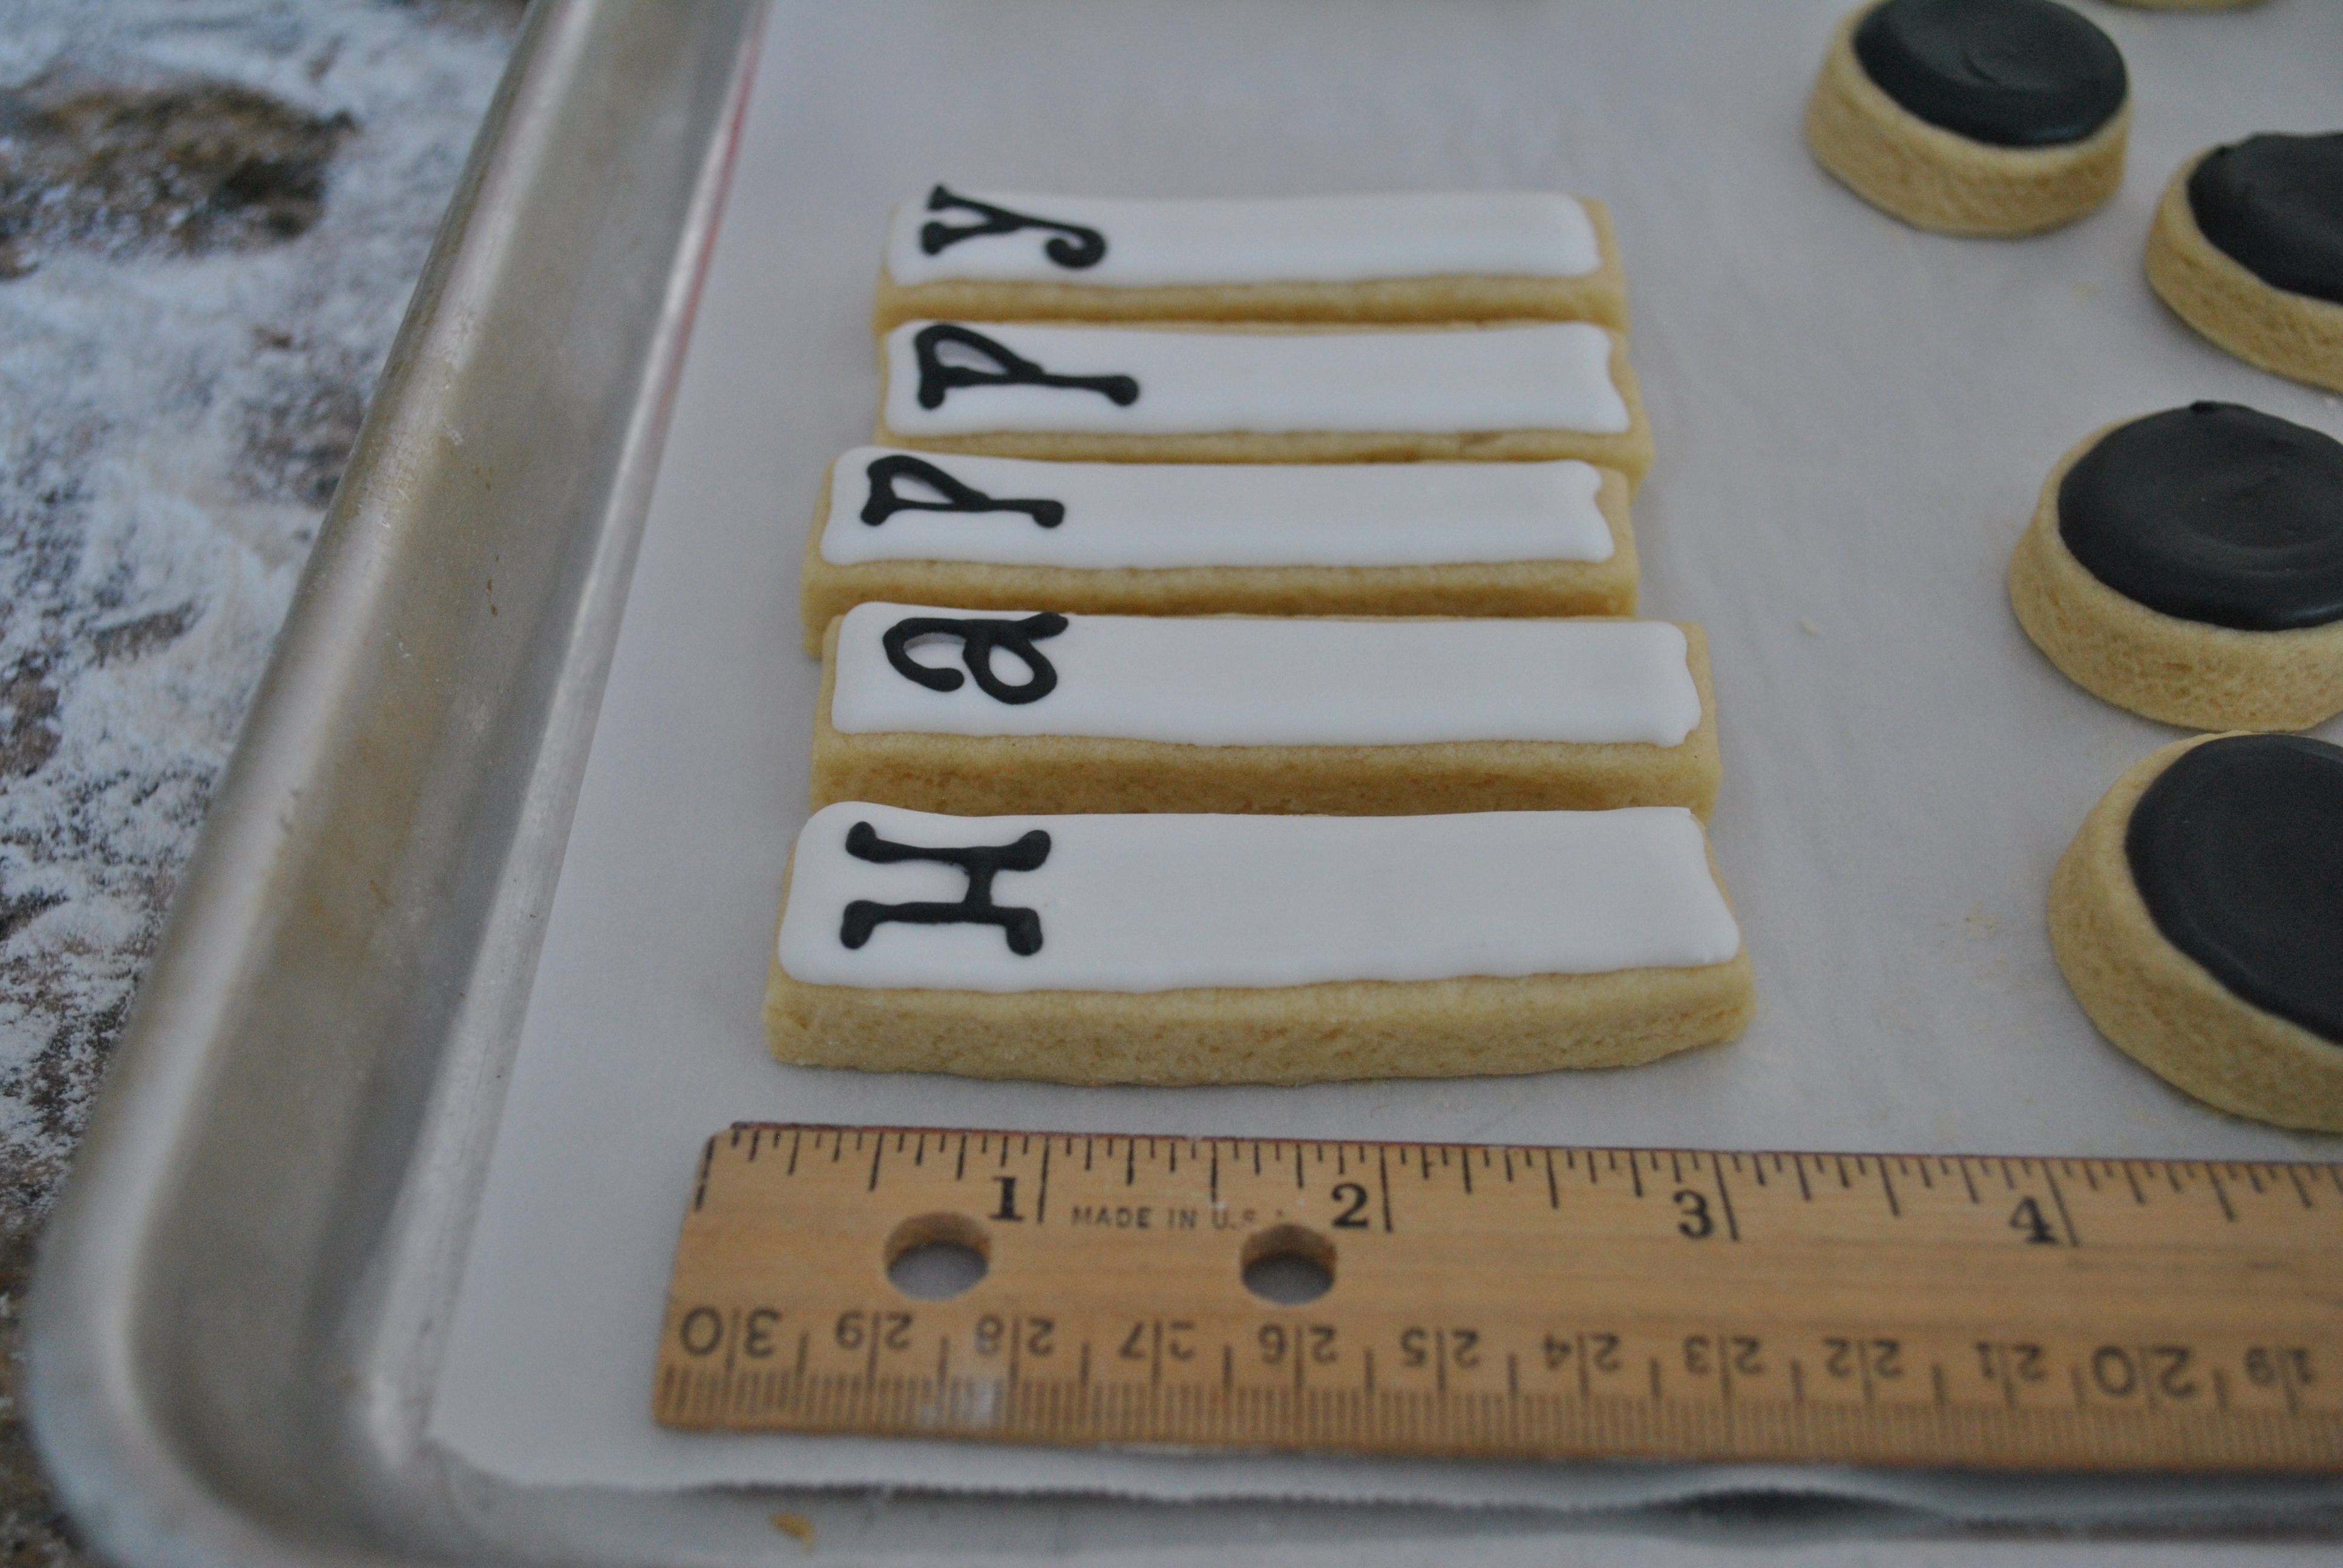
I cut out a cookie stack (using cutter set where each cookie gets slightly smaller) for the center to support the happy birthday sticks.  Unfortunately, it was late at night and I mistakenly thought I needed 12 sticks.  Um, “happy birthday” has 13 places, even without a space.  Duh.  So that’s why the sticks weren’t flat around the stack.  My bad.  Just do the math better than me and it will all fit.   These sticks happened to be 3″x .75″ each.

DSC_0669 DSC_0680

One more look at the entire production!

DSC_0689

Pink, Grey, and White Baby Shower

There is nothing finer than a request for a color themed baby shower and a flexible client.  This customer was so incredibly lovely and she was willing to let me take the design reins!  I hope she enjoyed the special day with her daughter(s) and the cookies!

DSC_0603

With pink, grey, and white as the underlying theme, I started with glaze (powdered sugar and water) for the onesies.  I love the complete.melt.in.your.mouth effect of glaze on a sugar cookie.  As long as your design in uncomplicated and you have the drying time, a glazed cookie will offer a little slice of heaven.

DSC_0554 DSC_0571

I used royal icing for the balance of the cookies.  Goodness knows there are a multitude of baby carriage designs out there, all beautiful.  But this is how I  approached the cookie for this order.  Started with a dried white outline.  Filled in the pink body and added the grey and white lines while the pink was still wet (immediately after each cookie was filled).  Then filled in the grey buggy cover.  Later came back to add black details.

DSC_0559 DSC_0578

Next I worked on the plaque cookies where I wanted to show off the baby’s name.  The general idea came from an IG @sara_sweetsmiles (facebook: Sweet Smiles).  You can follow the steps below.  The grey stripe/dots  and stamping (super black Americolor thinned with almond extract- see conversation hearts post) were added when base was dried 6 hours.

DSC_0582

DSC_0561 DSC_0563

Georganne Bell is a cookie goddess.  The LilaLoa website is a feast for the eyes and this creative “pinned to your heartstrings” cookie idea is totally hers.  Can’t say enough times how inspirational she is.

DSC_0574

I always like to make some “personalization” for presenting a platter so I used a popular bunting method to announce Miss Savanna’s coming.  I have seen it so many places now that I don’t know who to credit for the original idea.

DSC_0591

The request was for 50 cookies and I think it is always interesting to see how folks plate their cookies for presentation.  Here’s a glimpse of the layering as I went…

DSC_0598 DSC_0600 DSC_0604

Centerpieces for an Engineers Ball

Huh?  When did engineers start having dinner dances?  Apparently it is a tradition for the UB student engineers.  I knew one of the lead organizers and he knew my cookies.  This led to some fun centerpiece karma.  I made cookies for half of the 30 tables as there were about 15 engineering clubs involved… I kind.a added one or two more to feed my own pun addiction.  I have a “pun” problem.  A really, truly, serious problem.

So I don’t have pictures of all of the tables because blithering idiot here forgot the camera when venue set-up time rolled around.  The few I have are from my phone and the quality is not optimal.  I did take some pictures before I left the house.  So here they are!

Such Chemistry between Us (AIChemical Engineers)

DSC_0623 photo 1

Flying High (Aeronautics & Astronautics) -still favor the “paper” airplane…

DSC_0639 DSC_0636 photo 3

Can We be Civil? (Civil Engineers)

DSC_0653 DSC_0665

Saluting Computing (Computing Machinery)

DSC_0696 DSC_0692

Twinkle Twinkle Little Star, Power equals I squared R (Electrical Engineers)

DSC_0682

Space Cadet (SEDS : Students for the exploration and development of space)

DSC_0683 DSC_0686

You Drive me Crazy! (Automotive Engineers)

DSC_0648 photo 2

Take me to Your Leader (Robotics)

DSC_0609 DSC_0615

Science Pun Fun

DSC_0666 DSC_0674

There were also cookies for Black engineers, Hispanic engineers, Society of Women Engineers, Sustainable world, Biomedical engineering, Industrial engineering, etc.   Drat.  No pictures of those.  Need to plan more time for photos …

One in a Minion

Despicable Me minions were requested for birthday favors/a party platter, with some female versions included!  Conveniently, Sweet Ambs had just posted a tutorial on minion.making and, if ever anyone knew cookie decorating, it would be the awe-inspiring Amber Spiegel.  So I followed her directions other than also making a female version (birthday girl really likes blue so dresses are blue not the green from the movie), royal icing in my own “eyes,”  and using my own hearts (saying thank you to the guests, etc.).  The bigger minions (from 4″ rounds) all had unique faces but the favor sized (3″ tall rectangles) were the same design.

DSC_0596

Step one was flooding the little hearts and letting them dry.  About 6 hours later I painted on the “thx” or “luv” or “Liana.” In the meanwhile, I  did the yellow face background.  I let this dry for 4 hours (Sweet Ambs did not but I had an errand to run.  It worked for me.).  Next was putting on the pants and dresses; I placed the heart on while the icing was wet, basically as soon as the pants on each cookie was completed.  For the dress, I added the dots and bottom trim while the icing was wet first and then added the heart.

DSC_0568 DSC_0573

Then I continued following Sweet Ambs directions.  Here’s how they turned out.

DSC_0595 DSC_0579

After drying overnight, I put a boy and a girl (or Stewart dressed up as a girl) minion back to back to place in the favor bag.  Added a cute little tag and they were ready for the guests!

DSC_0608 DSC_0612

Other Valentines

Just some other Valentines Day cookies…  happy 14th!

A cookie a day keeps the doctor hap.pay!

DSC_0555

Hope there was no bitter in your Valentines Day…

DSC_0588

You make me happy…

DSC_0558

Did Cupid’s arrow hit the mark?

DSC_0561

Cookie stack.

DSC_0553

Mixed heart plate.

DSC_0552

More conversation hearts.

DSC_0560